Keeping this as a reminder of how I solved this issue.
Problem: Raspberry pi zero w keeps connecting and disconnecting
Solution: Restart your router, I have an ASUS RT-AX86U. Also restart your pi.

How to’s on how to fix things!
Keeping this as a reminder of how I solved this issue.
Problem: Raspberry pi zero w keeps connecting and disconnecting
Solution: Restart your router, I have an ASUS RT-AX86U. Also restart your pi.
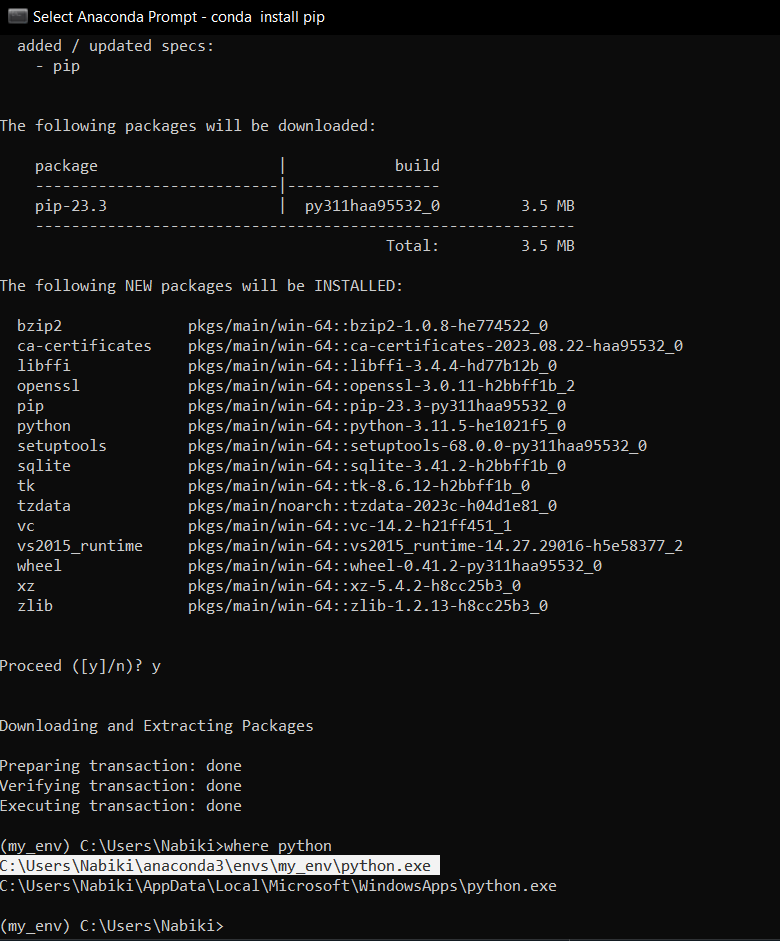
It took me a while to figure out a reliable and robust way to use conda environments in spyder, and today I’m going to share the details with you!
First things first, download the tools:
Create your conda environment
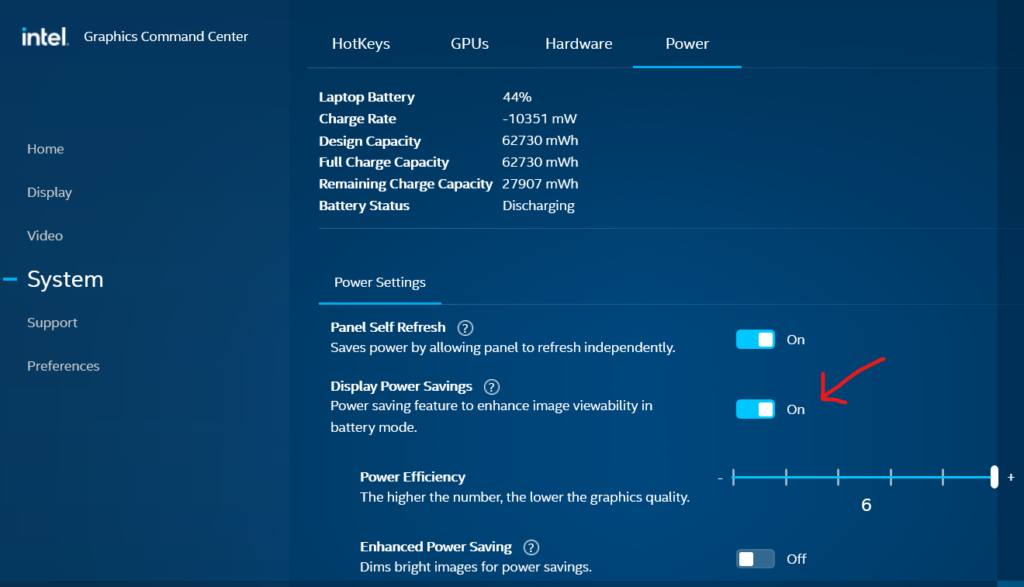
The color pallet on my new dell 7420 inspiron plus kept changing and the display looked horribly washed out or with horrible contrast. This took me too long to diagnose so I’m making a post about it. The post below was super helpful in diagnosis this so I am linking to it.
Problem: Washed our colors and contrast on a laptop with Intel Iris Xe Graphics
Solution: Disable Display Power Savings
https://superuser.com/questions/1487069/how-to-disable-intel-display-power-saving-technology
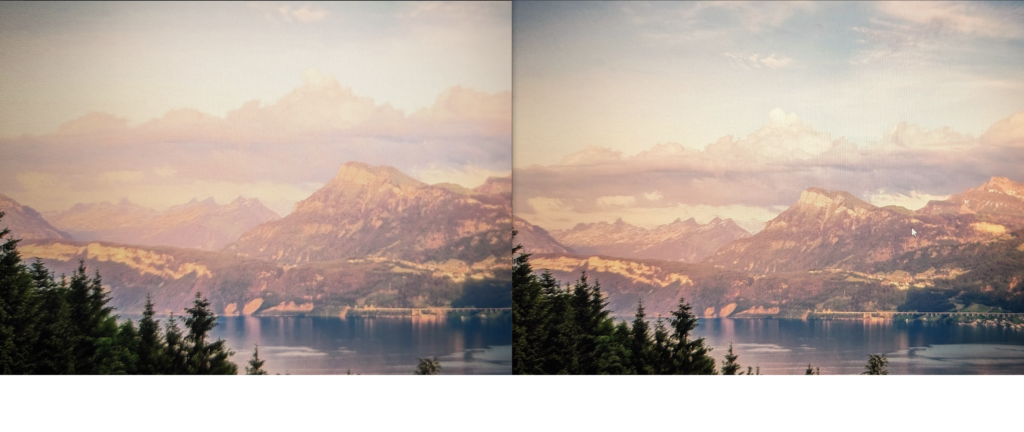
I tried taking a good picture but it was difficult to capture the fine details. Contrast was way off and pixels appeared blurry. On the left is with the settings enabled and on the right with the settings disabled. Pay attention to the details on the cloud, you can’t tell the detail on it on the left side. the details are also blurry and washed out.
What feels like one of dells last laptops with modular RAM, I decided to give this computer a try until something more modular and repairable comes along (Framework maybe?!) I bought the RAM and SSD below and upgraded the laptop. Be sure to disconnect the battery cable first! I tried disconnecting the cable connecting to the motherboard but it was stuck in there and I was nervous to apply much force. Luckily there is an additional connector on the other side of the battery cable, you can slide that metal tab down and pull the battery cable out.
Swap out the RAM and/OR SSD and it will boot up to a black screen. Be patient and wait about 5 min, it will eventually it will boot into the BIOS telling you hardware changed. I worried I fried something but fortunately that wasn’t the case. Hopefully this post helps you not freak out that something went wrong. Enjoy the upgrade ram and ssd!
Version 1.8 was taken down from the MS website for this motherboard, currently the latest version is listed as 1.7. If anybody is interested the 1.8 version is still up on the servers under the link below. Or I’ve attached it here if anybody want’s it.
https://www.msi.com/Motherboard/Z87-G41-PC-Mate/support
V1.7
https://download.msi.com/bos_exe/mb/7850v17.zip
V1.8 (notice only the ending changed but there is no link to it on the MSI website)
https://download.msi.com/bos_exe/mb/7850v18.zip
Just remove the “.pdf” extension from this zip file and that will contain this beta BIOS
There are no official firmware updates to this sound bar, but looking at the comments on the LG page, someone managed to use the firmware for LG SK4D 2.1 Sound bar which is what I did and it worked!
All you have to do is download the zip file and unzip the binary file into a flash drive that is FAT32 formatted, turn on the sound bar and set input to USB, then plugin the USB drive, the front LED’s will flash left to right until the sound bar turns off, firmware is now updated!
Download the zip file below and remove the “.pdf” extension. That will contain the latest SK4D firmware as of 11/14/2022
Support Page to firmware
https://www.lg.com/us/support/product/lg-SK4D.DUSALLK
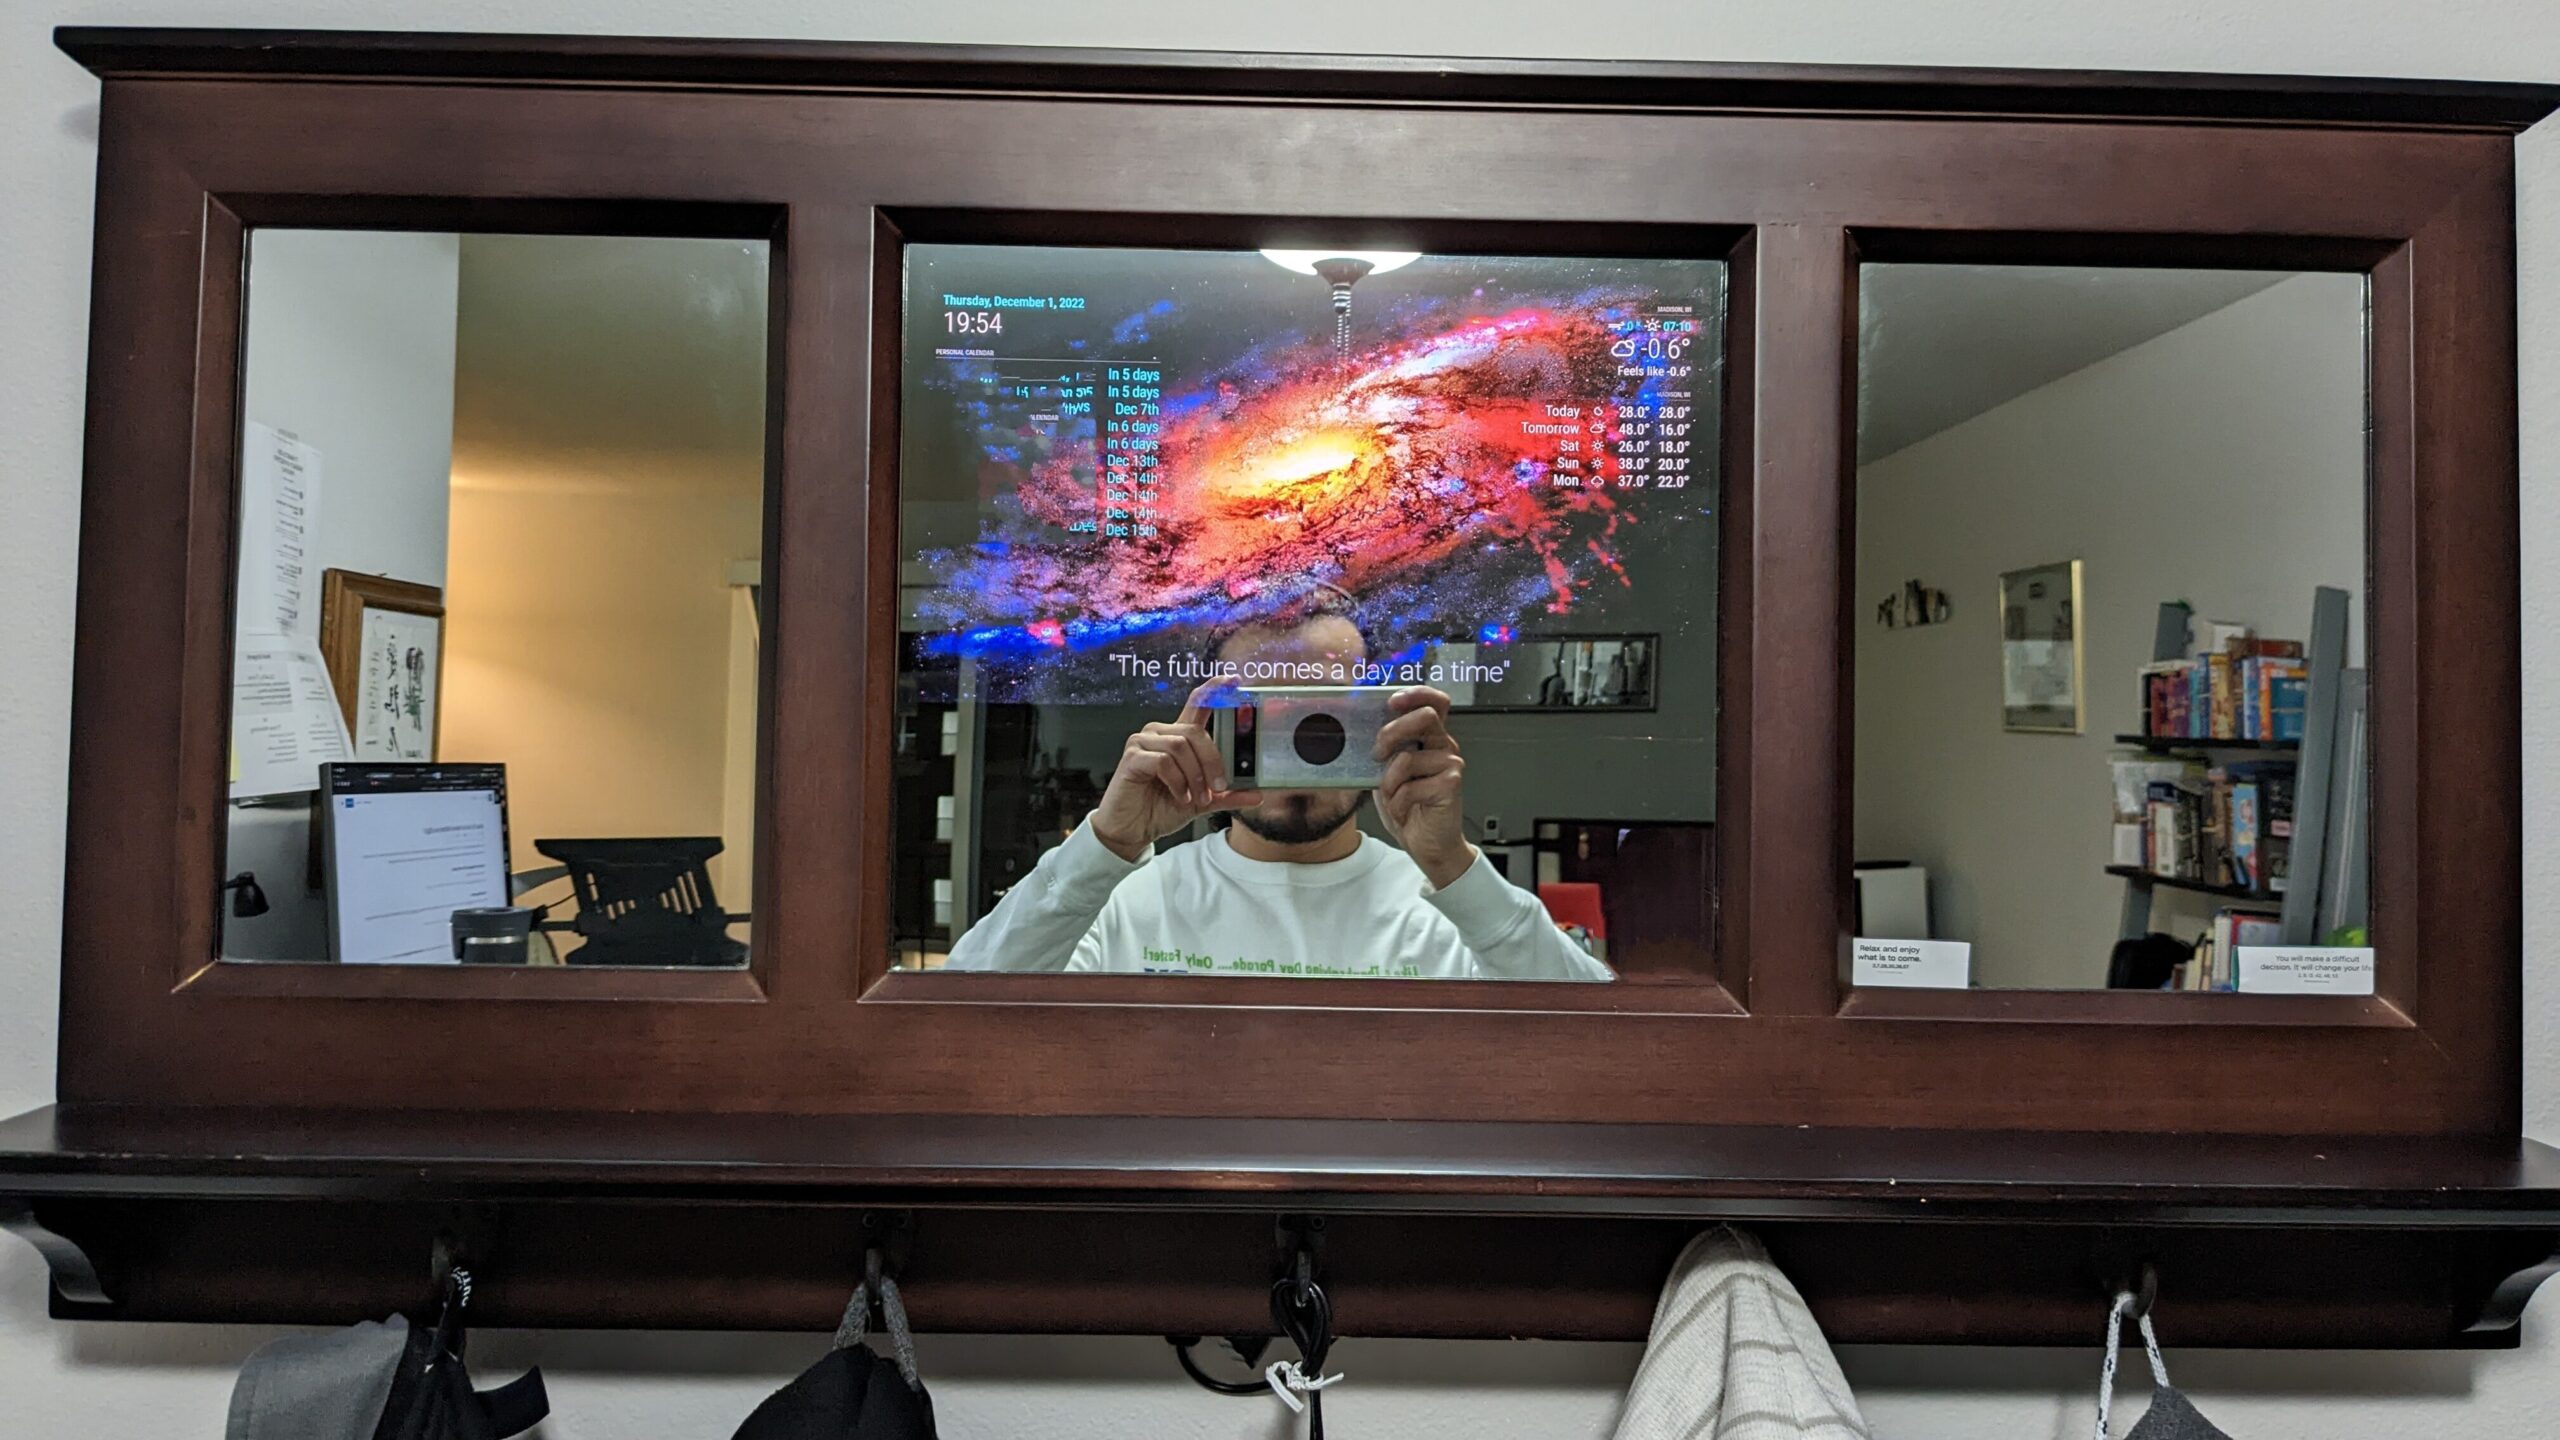
After electron deprecated the Pi Zero 32 bit version, my magic mirror was unusable and hacking it to make it work wasn’t working anymore. I had a raspberry pi 3 laying around and decided to replace the pi zero. Here are the steps I used to get my magic mirror up and running again!
1) Install 64 bit Raspberry Pi OS with Desktop
Latest steps are listed here!
https://www.raspberrypi.com/software/operating-systems/#raspberry-pi-os-64-bit
2) Install Magic Mirror
After you have your raspberry pi OS up and running and you have completed all the prompts, connected to your wifi and updated the OS you can follow the steps on this link to install the magic mirror manually.
https://docs.magicmirror.builders/getting-started/installation.html#manual-installation
3) For the background image slideshow to work
Once you have installed your magic mirror, change directories into the modules directory /home/admin/MagicMirror/modules and clone the latest version of the MMM-ImageSlideshow repo here.
* You can use something like FileZilla to SFTP into your raspberry pi and copy your background images into the exampleImages folder, deleting the stock images the module comes with.
* Use images smaller than your screen resolution, I use 1920×1080 because they fill my magic mirror completely.
* Also I would use darker backgrounds to keep the contrast of text to background, I like using images of space.
https://github.com/AdamMoses-GitHub/MMM-ImageSlideshow
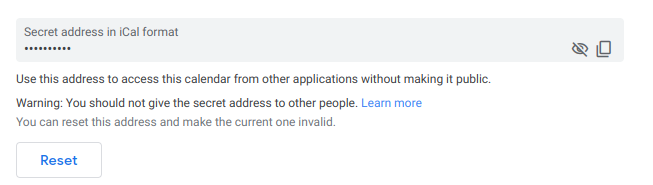
4) Google Calendar
Go to settings of your google calendar and scroll down until you see the section below, DO NOT SHARE this link with anybody else or they will have access to your calendar! insert that link in the config.json file
5) Start Magic Mirror Automatically using PM2
Follow the steps here for setting up the mm.sh that running pm2 will launch at boot.
https://docs.magicmirror.builders/configuration/autostart.html#using-pm2
Other Tips
* I have an outlet timer connected to my LED screen and to my raspberry pi, it turns on at 7am and that turns on the screen automatically and the raspberry pi, then pm2 boots up magic mirror
* At 10:50 pm I turn off the raspberry pi by adding the command 50 22 * * * /usr/sbin/shutdown -h now to the roots crontab at sudo crontab -e this prevents the raspberry pi boot drive from being corrupted by the outlet timer suddenly shutting down.
* Lastly here is my config file, css, backgrounds I found and compliments json if anybody wants to check them out!
** the config file goes in /home/admin/MagicMirror/config
** the compliments file goes in /home/admin/MagicMirror/modules/default/compliments
** the CSS file goes in /home/admin/MagicMirror/css
** and the backgrounds go in /home/admin/MagicMirror/modules/MMM-ImageSlideshow/exampleImages
After connecting my Aukey wireless earbuds EP-T31 to my laptop with 22.04 I noticed I had to max out the volume to listen at normal levels. Here’s how to fix that!
Problem: Bluetooth headphone volume too low
Fix:
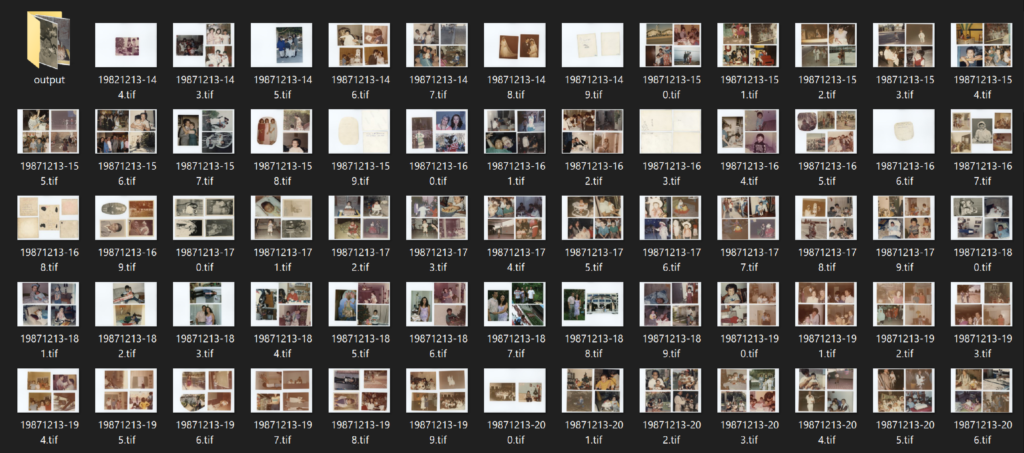
When we moved to the states, my parents brought with them from Mexico a large amount of old photographs, and also when my grandmother passed away, I inherited many more photographs. digitizing them was not easy task but here is my workflow and tips/scripts. Do it right the first time and do it once!
I originally wanted to get the Epson FastFoto FF-680W but after reading about a lot of the problems I decided against it mainly that I doesn’t save as true tiffs and that after a while the rollers produce a vertical line on the scanned photos. After doing some research I settled on the V600, although scanning would have to be manual….
Produce placement links to buy me kombucha:
Epson FastFoto FF-680W – https://amzn.to/3V4GGCp
Epson Perfection V600 https://amzn.to/3CCxez9
Manually selecting each photo on their GUI is a pain, and the auto-crop feature crops the border of your photos. So that was also not an option, scanning selected areas in the photos using their software was also MUCH slower than scanning a whole flatbed scan. So I resorted to scanning a 3-4 photos per scan and split them up later (see point #3). I used the professional setting, 800dpi as suggested by a reddit comment on the first link below, and 48-bit depth. his produced flatbed scans of about 300MB each.
For my job I do image analysis which involves single cell segmentation. Cropping photos and de-skewing them using python seemed like a no brainer given that image segmentation and modifications is what I do for a living. For this I wrote up a python function that would load all your images from a folder and one by one estimate edge/background of the photos, crop them and automatically de-skew them. This has worked beautifully on ~500gb of scanned whole flatbed scans, only failing around 5% of the time if photos are mostly white.
https://github.com/emmanuel-contreras/photography-tools
After scanning all these photos, they take up about 300GB of data, I wanted to be able to share them with family and friends without each photo being ~70MB, so one of the functions on the python library down samples the photos by a scaling factor (2 times smaller, 10 times smaller) and outputs the smaller versions into a folder. This is also included in the repository above!
CONGRATULATIONS! If you’ve made it this far you have digitized your older photos. Be sure to store them in a proper box with anti-humidify pads. if you ever need to re-scan them or scan them bigger you will have them.
Organizing all the photos is a major task on its own, I tried sorting them before scanning them and it proved to be too arduous of a task. my eyes would hurt after hours of trying to match photos of the same events. I instead decided to scan them all and worry about this later, so far I have decided to harness the power of macOS Photos application to do facial recognition and group photos by person, through machine learning. This is still a work in progress and will report back on how (un)successful this was!
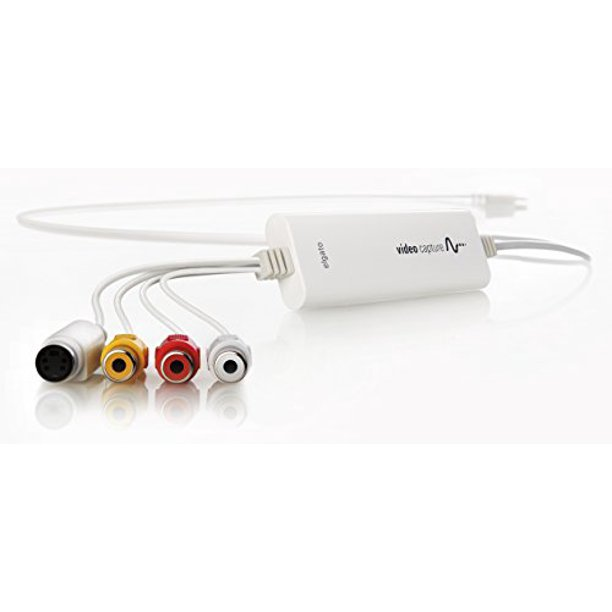
I recently bought one of these at a thrift store for $4 to digitize some tapes. I tried using my newest PC (AMD 5600x 32gb ram) and the video would freeze a few seconds into playing it. if I opened OBS at the same time, the audio would cut out but the video would keep playing on the elgato software. I finally gave up, don’t waste your time getting this device working on newer computers.
To get this working, I did have a spare PC and a windows 7 CD so I installed it on that computer, and after a little playing around with it it worked as intended not surprisingly, although a bit buggy, sometimes video would freeze unless you wen’t back to the video screen. also rewinding causes the video to freeze. I get the feeling if the signal on the software drops even a little bit, it will freeze the display on the elgato software. What I ended up doing was pressing play and right away quickly pressing next through the various screens and quickly started the recording.
If you do want to use this device I would suggest getting a cheap pc with windows 7 but don’t waste your time on newer