Keeping this as a reminder of how I solved this issue.
Problem: Raspberry pi zero w keeps connecting and disconnecting
Solution: Restart your router, I have an ASUS RT-AX86U. Also restart your pi.

Keeping this as a reminder of how I solved this issue.
Problem: Raspberry pi zero w keeps connecting and disconnecting
Solution: Restart your router, I have an ASUS RT-AX86U. Also restart your pi.
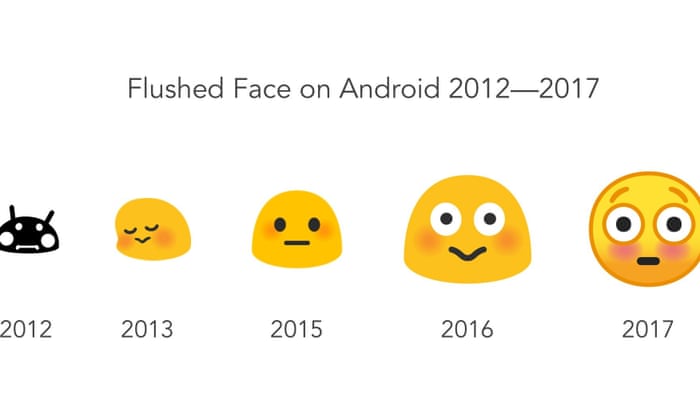
2016 excited face emoji, is and always will be my favorite emoji. Sad was the day when I went to look for it and could no longer find it in the keyboard. You will be missed
Intro
I didn’t expect much when Android 14 came out, looked around the forums and no major changes or issues. So a week into the release, I upgraded. A few days later I realized all the pictures on my phone were gone. Doing some googling led me to others having the same issue, except they described in more detailed the error, and the more I tried on my phone the more I realized how useless it had become. Applications crashing because of low storage, no ability to install new apps, cannot send or receive photos, camera is unusable because it thinks there is no storage. This bug in particular affected people with multiple profiles, a feature that a small percentage of android users use.
Initial response
What did google have to say about this? –NOTHING– no communication, or message or email. Then the articles on various sites came out highlighting the pointing to the issue. Which forced google to acknowledge it.
Public response and Issue tracker
So google started a public page for the bug on their external bug tracker, it listed the issue as P2, it’s a bug but not critical, and no google member assigned to it. Android 14 release continued, they’d fix the issue eventually but no timeline yet, and worse, no communication of official statement. As this went on, people who called google were told to factory reset their device and lose their data, many people got stuck in a boot loop with no way to use their phone or backup their data, and the fortunate ones had a significantly useless phone, but it would at least boot up. a week or two passed and the issue tracker reported more people and more loss of data. Three weeks later and only a couple communication messages on the issue tracker, barely any communication, or apology. Sometime in those two weeks they realized the screw up and changed to status to P0 which means critical bug and needs to be fixed before any major release of android. By now the number of people having this issue got closer to one thousand, many people stuck on boot loop and many waiting for useless phones.
I’m not sure if this page will still be up but this is the link to the issue tracker
https://issuetracker.google.com/issues/305766503?pli=1
Do realize that many people depend on their phones for two factor authentication, an unusable phone means you won’t have access to secure services like email, VPN, etc which are daily necessities for many.
Hiding the screw up
The release notes on the Android 14 QPR1 Beta 2.2 (November 2023) page did not explicitly list this issue, even though it clearly fixed it. The only note that maybe alluded to this critical issue was this
Fixed an issue that caused memory corruption in rare cases.
Which does not encompass the severity of the bug that was fixed.
For me and for many, this will be my last pixel phone. It’s not the fact that they had a bug in their software, it’s the lack of communication, urgency and accountability. Not only the it feel like they were dragging their feet on fixing this, but people who actually lost data or precious memories did not even get an apology for the screw up.
This bug appears to have resurfaced in 1/24/2024…
https://www.theverge.com/2024/1/24/24048920/google-pixel-bug-internal-storage-access-crashing-apps
On March 4th 2023 my friend Corey Poland passed away. He was a great friend and will truly be missed by everyone who’s lives he touched. He was always kind, caring and lived life to it’s fullest. His blog will continue to be available through this link https://coreypoland.emmanuelcontreras.com/
His mother also has a page for him with information about his memorial service and other slideshows of his life https://nancyrpoland.com/in-memory-of-corey/


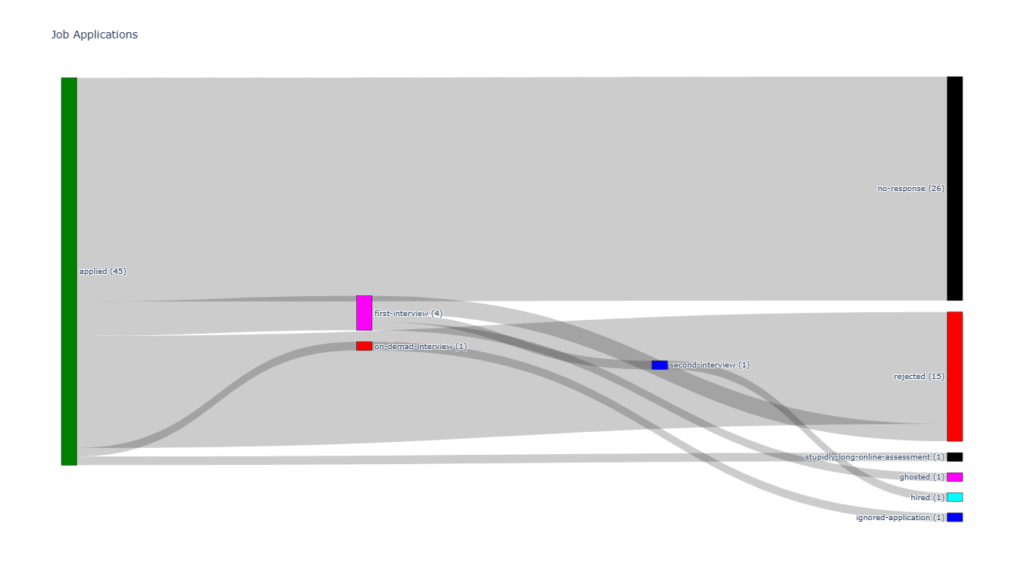
Job searching after the pandemic has been difficult, there is lots of competition, especially with the many layoffs happening in many larger companies and everywhere. I also found it difficult given my specific knowledge of single-cell image analysis which is a much smaller field. With all the competition, especially in the data science, domain knowledge was what I think made me stand out from other candidates. I wanted to share with others my job application trajectory to give some perspective of what it took.
If you are looking for a job, don’t get discouraged and keep applying. You can see how most of my applications got no responses and many rejected soon after I applied.
If you’re curious to see the code that I used checkout the repository
https://github.com/emmanuel-contreras/jobs_sankey_plot
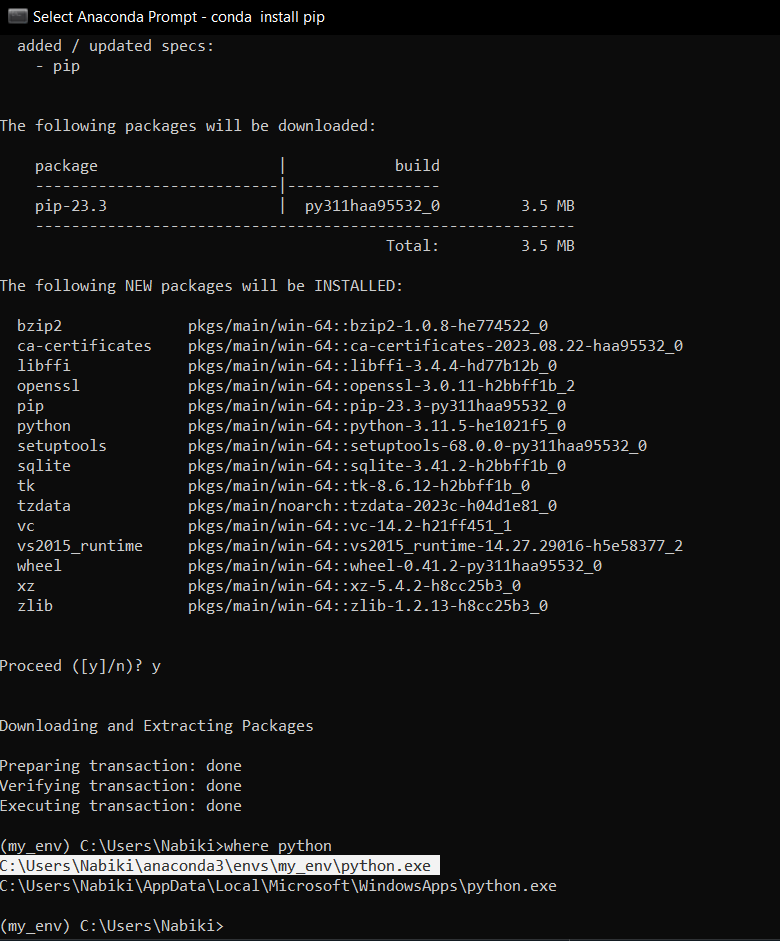
It took me a while to figure out a reliable and robust way to use conda environments in spyder, and today I’m going to share the details with you!
First things first, download the tools:
Create your conda environment
The color pallet on my new dell 7420 inspiron plus kept changing and the display looked horribly washed out or with horrible contrast. This took me too long to diagnose so I’m making a post about it. The post below was super helpful in diagnosis this so I am linking to it.
Problem: Washed our colors and contrast on a laptop with Intel Iris Xe Graphics
Solution: Disable Display Power Savings
https://superuser.com/questions/1487069/how-to-disable-intel-display-power-saving-technology
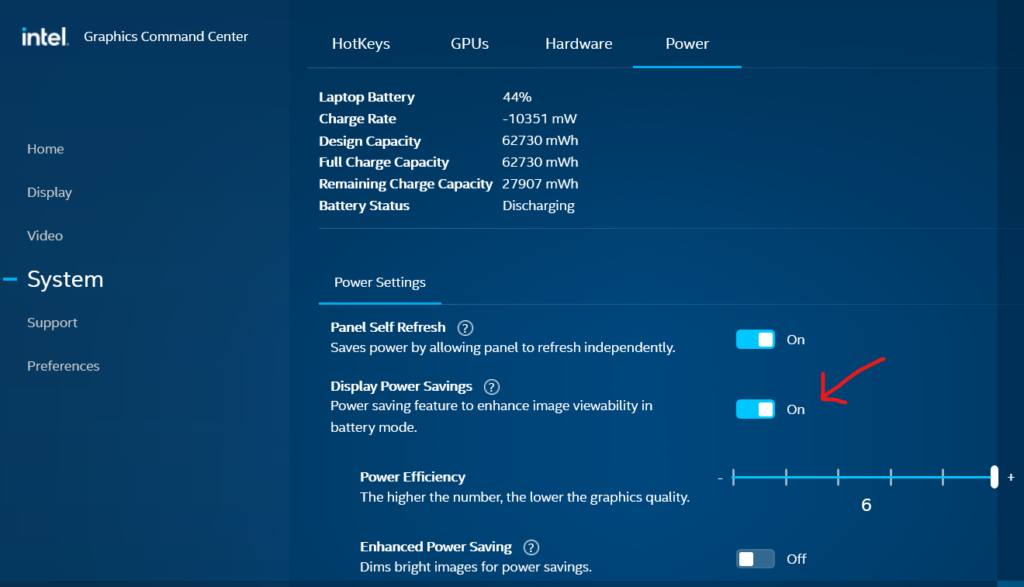

I tried taking a good picture but it was difficult to capture the fine details. Contrast was way off and pixels appeared blurry. On the left is with the settings enabled and on the right with the settings disabled. Pay attention to the details on the cloud, you can’t tell the detail on it on the left side. the details are also blurry and washed out.
What feels like one of dells last laptops with modular RAM, I decided to give this computer a try until something more modular and repairable comes along (Framework maybe?!) I bought the RAM and SSD below and upgraded the laptop. Be sure to disconnect the battery cable first! I tried disconnecting the cable connecting to the motherboard but it was stuck in there and I was nervous to apply much force. Luckily there is an additional connector on the other side of the battery cable, you can slide that metal tab down and pull the battery cable out.
Swap out the RAM and/OR SSD and it will boot up to a black screen. Be patient and wait about 5 min, it will eventually it will boot into the BIOS telling you hardware changed. I worried I fried something but fortunately that wasn’t the case. Hopefully this post helps you not freak out that something went wrong. Enjoy the upgrade ram and ssd!
Version 1.8 was taken down from the MS website for this motherboard, currently the latest version is listed as 1.7. If anybody is interested the 1.8 version is still up on the servers under the link below. Or I’ve attached it here if anybody want’s it.
https://www.msi.com/Motherboard/Z87-G41-PC-Mate/support
V1.7
https://download.msi.com/bos_exe/mb/7850v17.zip
V1.8 (notice only the ending changed but there is no link to it on the MSI website)
https://download.msi.com/bos_exe/mb/7850v18.zip
Just remove the “.pdf” extension from this zip file and that will contain this beta BIOS
There are no official firmware updates to this sound bar, but looking at the comments on the LG page, someone managed to use the firmware for LG SK4D 2.1 Sound bar which is what I did and it worked!
All you have to do is download the zip file and unzip the binary file into a flash drive that is FAT32 formatted, turn on the sound bar and set input to USB, then plugin the USB drive, the front LED’s will flash left to right until the sound bar turns off, firmware is now updated!
Download the zip file below and remove the “.pdf” extension. That will contain the latest SK4D firmware as of 11/14/2022
Support Page to firmware
https://www.lg.com/us/support/product/lg-SK4D.DUSALLK