I love garage sales, and I love thrift stores, why? cheap electronics 😛 Friday after work, I left on a thriftshop run with my mother. I always check electronics first. I often see 17-19 inch 4:3 monitors but they are often priced at $50 which imo is way overpriced. Today i happened to see a widescreen monitor which appeared to be ~21-23 inches. Samsung 2232GW. I plug it in and I dont see anything on the display. I wait a few seconds and see that there is a flashing “digital/analog” box. One of the employees comes over and says “I thought It was working…. let me take it back”… I quickly replied that I would buy it and test it at home. When I got home, I did a little bit of research and figure out these monitors had defective capacitors and that they would be easy to replace. I quickly serached a youtube video and figured out how to open it up. Somebody from Ebay sold me a “repair kit” with the exact 7 capacitors known to go bad, and in a few days they arrived.
Step 1: Opening it up
I would make a video but I dont have three hands or a good camera.. I used a couple of iPod opening prying tools which worked great, although they broke near the end. There are no screws but are just clips. start in the bottom left of the monitor by the corners, they are easy to push apart and wont be obvious if you scratch it up. Once all clips are loose, lay the monitor flat on the ground and the top can be removed.
Step 2: Unclip
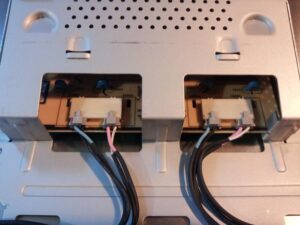
The left metal plate can be removed, under that unclip the pins to the cathode tubes, note where they are clipped. Take a picture if you need it. Unclip the connector to the screen by pinching the sides and pulling on it, wiggle it if you need to.
Step 3: Remove the power supply board
The top on is the one that contains the bad capacitors. BE SURE TO REMOVE THE CHARGE FROM THE CAPACITORS. in particular there is a big one with the potential to shock you. Short it out to do that. Also to the same with the ones you will be removing.
Step 4: Get a soldering iron of over 25watts
Soldering took me about an hour and a half because my soldering iron wouldnt melt the solder enough to pull the bad capacitors off. After messing with this enough I did manage to get the capacitors off and solder the good capacitors but I would not recommend it.
Step 5: Replace the Bad Capacitors
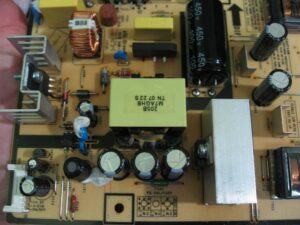
The capacitors that need replacing are on the picture. Note: Capacitors are polarized, be sure to align the positive with positive and negative with negative. Capacitors have a + or – on one side. Also the shorter poles are often the negative side and longer poles are positive.
3 on the bottom in a row (820uf 105C 25v).
2 on the right side (820uf 105C 25v).
1on the bottom left corner (330uf 105C 25v).
1 to the left of the yellow thing in the middle (47uf 105C 25v )
Step 6: Put it back together
Put it back to gether and try it out! Look at the pictures for help and reference 😛


